Monday, November 12, 2012

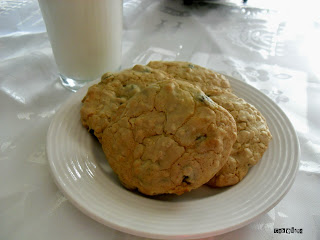
Soft Oatmeal Raisin Cookie Recipe

This is a very simple Oatmeal Raisin Cookies Recipe. Every time I make them they disappear super fast.
I really like this Recipe cause I find with other Oatmeal Cookie Recipe that it calls for a little to much Oatmeal. I also like to add a little Coffee Creamer to the milk it adds a nice flavor and softness to the cookies. Use your favorite coffee creamer.

Ingredients:
2 Cups All purpose Flour
1/2 Teaspoons of Salt
1/2 Teaspoons of Cinnamon
2 Teaspoons or Baking Soda
1 Cup Firmly packed Light Brown Sugar
1/2 Cup White Sugar
1/2cup (1 stick) Butter or Margarine Softened
1 egg
1/2 Teaspoon of Vanilla
1/4 cup of Milk
1 cup Rolled Oats
3/4 Cups Raisin
1/2 cup Pecans or Walnuts chopped (optional)

Preheat oven to 375*f. 
Step 1: In small bowl combine flour,salt,cinnamon and baking soda and set aside.

Step 2: In large bowl combine brown sugar and butter and beat until creamy.


Step 3: Beat in egg and vanilla until light and fluffy


Step 4: Stir in Milk than add flour mixture and rolled oats separately to cream mixture, blending while until after each addition.


Step 4: Stir in Raisin and nuts.
*Note: I didn't add nuts to my cookies*


Step 5: Drop by teaspoonfuls onto un-greased cookie sheet. Bake for 8-10mins or until lightly browned.

Serve with a tall cold glass of milk and enjoy.


Saturday, November 10, 2012

Spongebob Squarepants Frozen Butter Cream Transfer

 Making a frozen butter cream transfer is simple to do.
This was our second time attempting to do a frozen buttercream transfer.
We chose to do a Spongebob Squarepants Frozen Butter Cream Transfer
For this transfer you'll need a picture of Spongebob (or whatever character you want to do) recipe for crusting butter cream icing, piping bags, and piping tips #7, #3 and #2(next time we'll probably use bigger tips for certain areas to avoid lines but you learn as you go :).


 Step 1: First we started out with a tip #7 and black icing to outline his body. For his smaller features we used a #3 and #2.


Step 2: After outlining the whole picture, put him in the freezer for about 15 mins. After that, color him in, starting with his smaller features such as his sponge holes, tie, eyes and teeth. For his pants we just added cocoa powered to the icing and plain icing for his shirt.


Note: For the features  that only needed a little icing(like his red tie, sponge holes, etc) we used piping bags made out of wax paper.
Step 3: After finishing the features and clothes, begin on coloring in his body with yellow icing and tip #7. If you like, you can use a bigger tip.


Step 4: Once he's all colored in, take some more yellow icing and cover his entire body. Smooth it out gently until it's all even. This provides a sturdy base for the transfer. Put the transfer in the freezer for a least an hour or overnight.


Step 5: After the transfer has in been in the freezer for a least an hour, take a plain icing cake of your choice and carefully flip the transfer icing side down onto the cake, remove wax paper. Be sure to work kind of fast on this step so that it doesn't thaw out before it's flipped onto the cake.
We decorated our cake with a blue and white border using a star tip. Then we made sky flower butter cream transfers but you can decorate your cake any way you want.


And there's your Spongebob Frozen ButterCream Transfer.


Saturday, November 3, 2012

EASY! Butter Cream Icing Recipe.

This a very simple and easy butter cream icing recipe.I use this icing recipe for most of my cakes and cupcakes.
Ingredients:
1 stick unsalted butter
1/2 tsp of Vanilla Extract
1 16ox box of powder sugar
2 or 3 tablespoons of milk or more

To make icing combine all the ingredients together and mix to combine. I like to mix my icing about 5 minutes to get a nice white and fluffy icing. You can also add different jams to your icing to give a different flavor. Added food color to your icing can make for a beautiful icing Cupcake or Cake!


Friday, November 2, 2012

SpongeBob SquarePants Frozen ButterCream Transfer! Coming Soon!!

Almost everybody loves Spongebob! We’ll show you how to bring him almost to life with this amazing and fun technique called Frozen ButterCream Transfer!


Check out the link to find out how to make your own Frozen Butter Cream Transfer!!


Sunday, October 28, 2012

DIY! Wilton's Thanksgiving Turkey Cake! instructions!

 Wilton Thanksgiving Turkey Cake

Do you wanna impress your guests this Holiday or Thanksgiving? Then just follow these easy steps for a Thanksgiving Turkey Cake! All you need is a Wilton Turkey Cake Pan, A 2 Layer Cake Recipe, Butter Cream Icing, Food Coloring, Some Piping Bags and Tips.
You can use whatever cake recipe you want for this. Also you can be creative and use whatever colors and tips you want to icing this cake.
First we started out with a two layered yellow mix box cake, normally we make our cakes from scratch but we wanted to try something different. Also, using a box cake can save you some time.
Follow the cake instructions on the box. We used Pam Baking Spray to coat our pan, if you don't have that than oil or butter the pan and coat with flour. After baking, let cake cool 10 minutes on a wire wrack.
After 10 minutes flip the cake out onto a cake board and let cool for an hour or more.  You can even bake the cake a day before icing it.
We used Vanilla Butter cream Icing and Chocolate Butter cream Icing to decorate the cake.

Step One: We started with outlining the turkey feathers and body with chocolate butter cream icing with a Wilton tip number 3. We used cocoa powder to get the brown color since we didn't have brown food coloring but you can use brown or black food coloring for the outline. The outline does not have to be perfect!


Step Two: Then we used a Wilton tip number 17 and brown icing to fill in the Turkey's head and body. For the Eye we used white butter cream icing and a Pearl sprinkle.


Step Three: After filling in the body and head we used Wilton Tip 13 and white butter cream icing to fill the tips of the feathers and Wilton tip 17 for the chest. We did the part that would be the side of his wings brown and his chest white. 


Side Step: After icing one layer for his side wings, we thought it looked a bit plain so we went over them again and made connecting half circles to look like wing feathers and then we lined the inside of the wings with white to really make them pop out.

Step Four: We used red and a little white butter cream icing to do his gobbler and five bottom feathers with Wilton tip number 17.


Step Five: We two toned the icing with Orange and Red butter cream icing. We used a tip number 17 for the outer layer of feathers and than a Tip number ? for the inter layer of feathers. For the bottom feathers we added white icing to the red and orange icing to make it a 3 tone look.
Note: You don't have to do two-toned colors, you can do the colors separate if you prefer.


Step Six: Around the edge of the cake we did a rose border going around the cake with a Large Wilton Star Tip. You don't have to do that you can just icing the cake around the edge.


Last Step: Serve and Enjoy!!